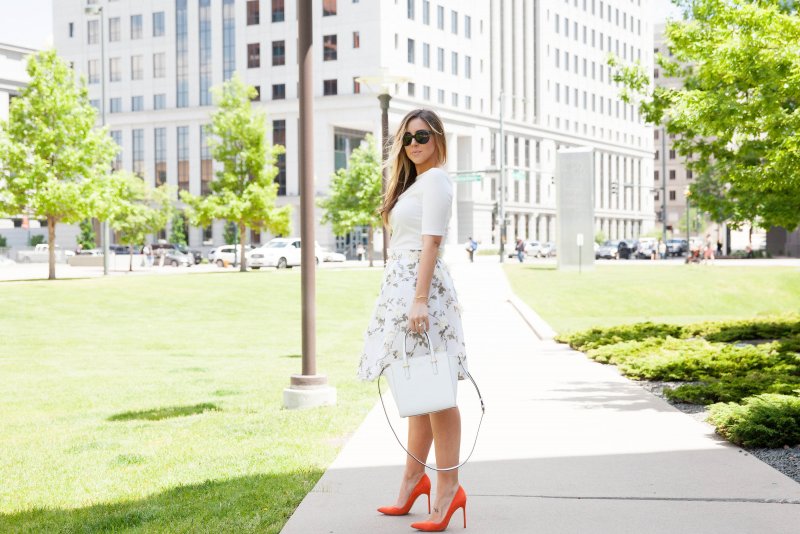
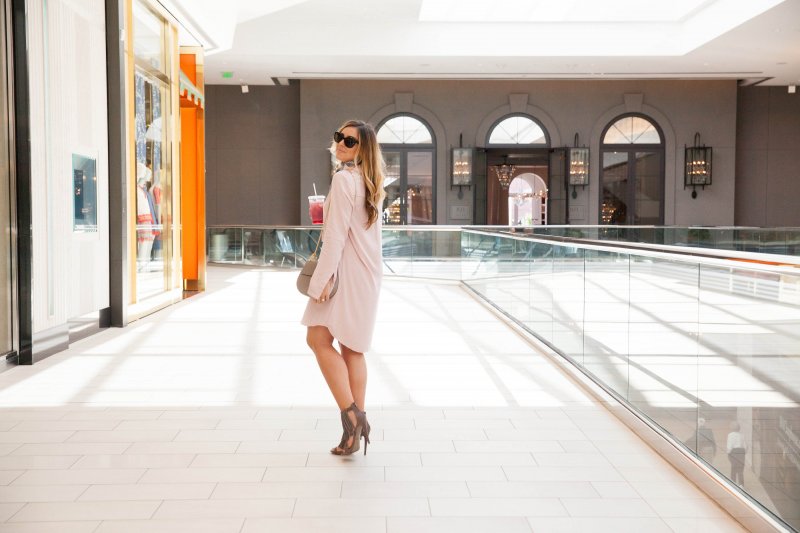
I always suggest having a go-to full skirt like this in your spring and summer wardrobe. The style is flattering and it can be paired with so many different top + shoe combinations to create looks for virtually any event on your calendar.
This option I’m wearing has beautiful 3D blooms scattered across its structured mesh fabric and is an affordable $50, leaving you room to spend on luxe accessories or pieces to pair it with. I was really pleased with the quality of this skirt and I’ve been wearing it to events and date nights around Denver. I went one size up, as this runs a bit small.
Check out my styling suggestions below…
Work
Tuck a silky tank into this skirt, then top with a light colored blazer. Pair this look with classic flats or nude pumps to keep this look office appropriate.
Weekend
Whether you’re headed to brunch with friends or your local farmer’s market, a simple cotton tank will keep you cool in stifling temps. Pair with casual sandals.
Date Night
Keep the tee I’m wearing above (it can be worn off-shoulder as well) but add a moto jacket on top for a little edge. Wear my pumps for a pop of color or switch to booties as the temps cool down.
I’m happy to tell you that I’ve partnered up with the Bond Twenty team as a Summer Editor to write a series of posts for their incredible online fashion and lifestyle community. I love their romantic, feminine aesthetic and I think it pairs perfectly with mine.
If you’re new to meeting me, I’d like to say hello and share a little about myself so you can get to know me better. I’m married to my best friend and love of my life and we live in Denver, Colorado with our three dogs. If you’re an animal person, I automatically love you because we treat like children too often for their own good – like the Easter treat hunt we had for them this year.
I began writing online while I was still in law school and am now blogging full-time after launching my fashion + lifestyle blog The Cashmere Gypsyin August 2015. On my site I document my personal style, create beauty tutorials and reviews, write about lifestyle topics like home decor and weddings, and share my travel experiences with my readers. The hard part? I’m a work in progress and am still seeking to achieve a work-life balance because “being your own boss” can be tricky. My favorite part? I love connecting with other women via my blog and social media and lifting each other up with positivity… I’m a girls’ girl through and through.
One of the questions I’m asked most about being a blogger is, “So what do you do all day?” Blogging is an untraditional job and can seem somewhat confusing to those with more traditional jobs and even to people in the blogging world. Over time and as I’ve transitioned from a hobby blogger to a professional one, my day-to-day activities have definitely changed. I hope this post answers some questions for those of you who are curious… And may even help bloggers out there who are wondering how to balance their day and organize their schedule.
At the bottom of this post, I’ve linked some great resources for you work-at-homers out there and I would love to hear any advice or tips you’re able to contribute. How do you stay focused? How do you stay organized? How do you manage the work + life balance? And how do you force yourself to “shut off” work at the end of the day?
6:30 AM
My alarm goes off a few times and I allow myself an hour or so to browse through my social media and interact with my readers and followers. I love chatting with my readers so much, I often spend this time responding to them and sometimes I don’t even get to my emails! Oops… We’ll handle those later.
7:30 AM
I check in with my photographer. We go over the outfits we’ll be shooting next and discuss upcoming projects and events. It’s important for us to be on the same page so my blog calendar stays up to date and I’m not late on any post deadlines.
8:00 AM
I like to start my day with a cup of coffee and head outdoors because working primarily at a computer can be stifling. I think it’s great to get a breath of fresh air and get moving in the morning. I rake leaves, shovel snow, or water flowers depending on the season. It may sound silly, but I really look forward to this time each morning.
8:45 AM
I head to the gym, where I take a ballet barre class. I’m getting back into a workout routine and I love the accountability group classes provide. (There’s no way for me to slack off or escape without embarrassing myself!) I grab a bouquet of fresh flowers on the way home.
11:00 AM
I get ready quickly and my photographer meets me to shoot two looks for next week’s blog posts. Since my work is mostly visual, I always set aside time for photography… Some days it may be a longer shoot with more outfits, some days my husband snaps some photos after he returns home from work, and some days I photograph things around my house. The only exception is when I’m filming a makeup tutorial or beauty product review; I allow about four hours to film and edit, so I usually skip photos on those days.
1:00 PM
I head to a lunch meeting with a local boutique owner and her marketing manager. We discuss my brand, their brand, and ways we could collaborate and work together. I make notes to follow-up on later.
1:45 PM
I return home and am distracted by my dogs for a solid ten minutes… I just can’t resist their sweet faces. Oops. Back to emails… I receive a lot of emails for the size of my little business. A majority of my email time is spent saying no to brands that aren’t a good fit, which is always difficult for me. I touch base with people on ongoing projects and confirm upcoming meetings. I get so excited when a new and exciting opportunity comes into my inbox… I think I’ll always get butterflies when that happens.
3:00 PM
I eat a cookie really healthy veggies as a snack. I’m constantly telling myself I’ll finish my posts a week or two before I publish them, but it rarely happens. So today I edit my photos, add product links, and write my blog post that will go up the next day.
5:00 PM
It’s planning time. And this particular day I use it to move some projects around, plan blog posts for next week, and plan out my Instagram posts for the next day. I prefer old school planners I can actually write in because if I don’t plan and write things down I am a total mess and never accomplish anything… Not kidding in the least.
My organization tips if you’re like me? I have one nice planner for my personal appointments and reminders, family events, and upcoming activities and special occasions. I keep another planner solely for work where I can scribble, cross out, and white-out things as my projects and tasks change. Instead of writing a million to-do’s into my planner and feeling awful if I don’t get to them, I have a notebook of ongoing to-do’s and I just cross them off as I go.
6:00 PM
I prepare and cook a Blue Apron dinner for my husband and myself. I am mildly concerned about the amount of garlic I used because we have an event to attend tonight. Husband does dishes.
7:30 PM
After dinner, we attend a charity event hosted by a local boutique in downtown Denver. It’s a great chance to meet people and network with local brands and business owners.
9:00 PM
Back home, I quickly browse through my emails to make sure I haven’t missed anything urgent and I prepare my Instagram post for the next morning. I do some laundry, respond to blog comments, and respond to Instagram comments while I watch Grace and Frankie on Netflix. (If you haven’t watched, it’s great!) I am an incurable night owl, so I read for 30 minutes before dozing off around 12:30 AM.
Are you a blogger, freelancer, or entrepreneur? Below I’ve linked some resources that might be helpful to you as you plan and organize your week. Feel free to link more down below in the comments!
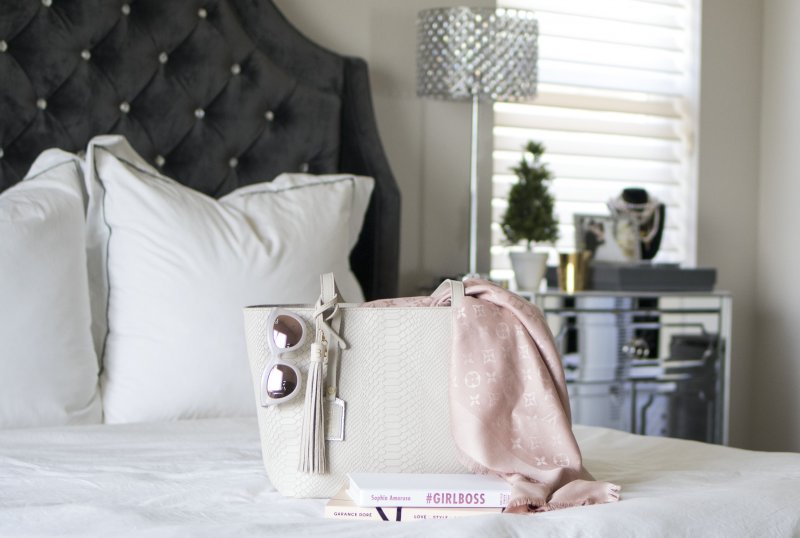
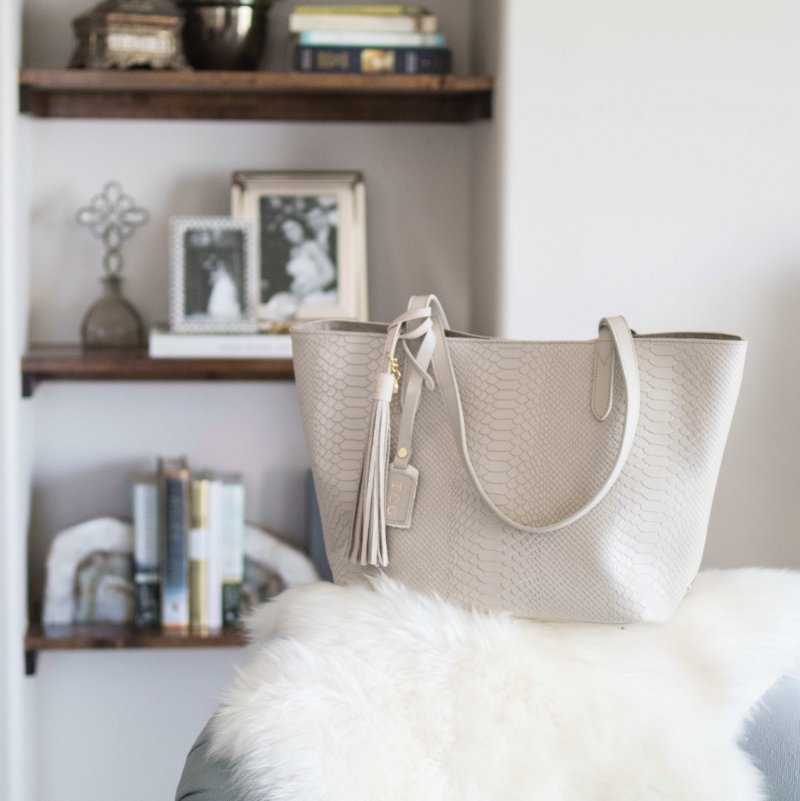
I posted this photo after a long day of blog photos. This pretty tote looks polished but still holds all the essentials!! I especially love the monogrammed hang tag it comes with and the bag tassel you can add on.
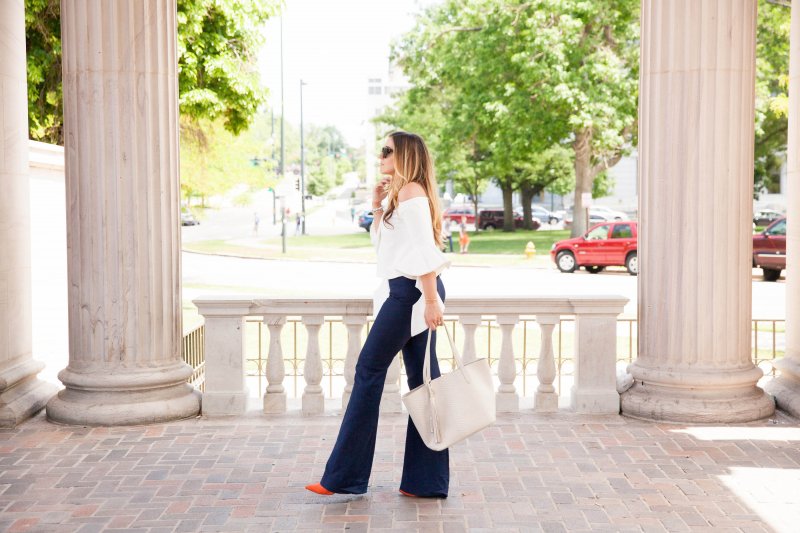
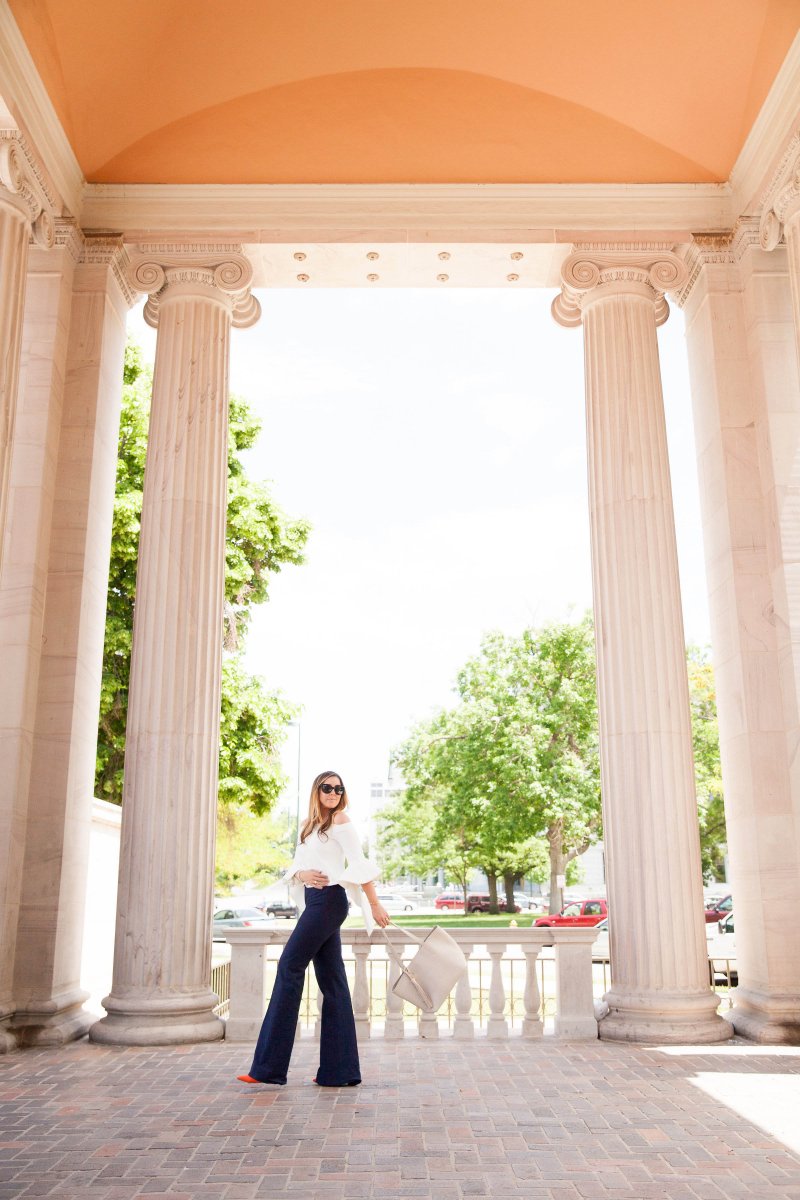
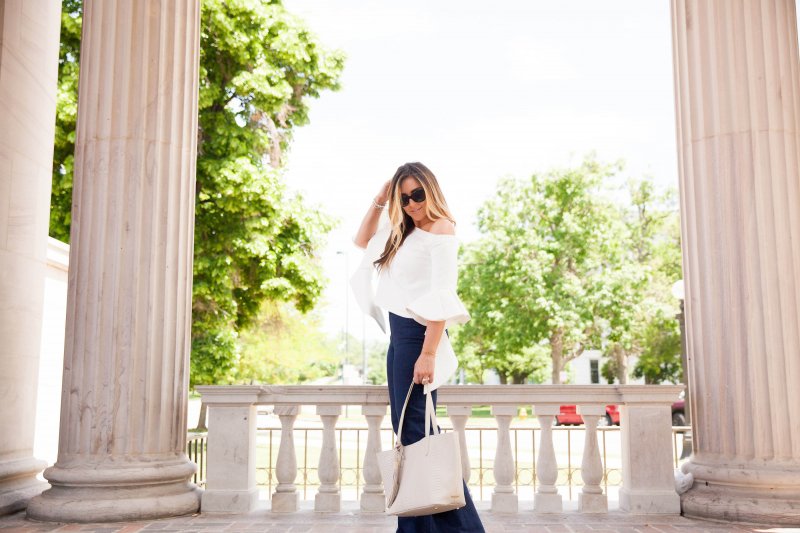
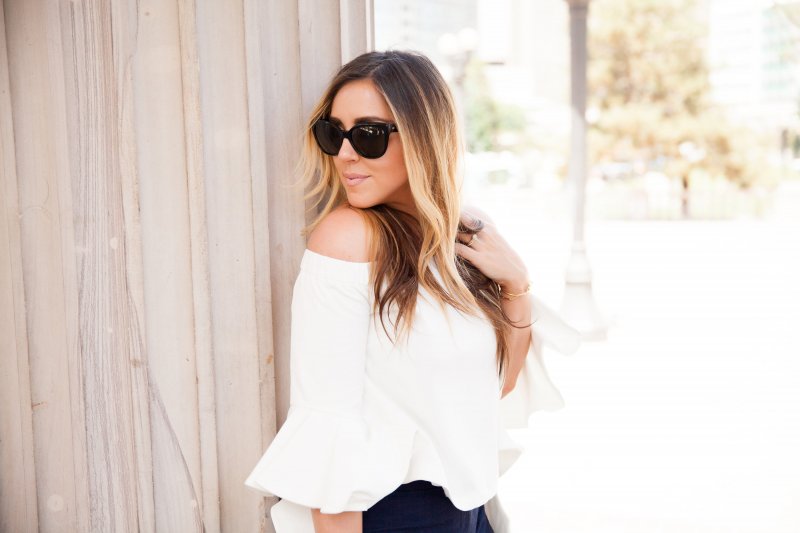
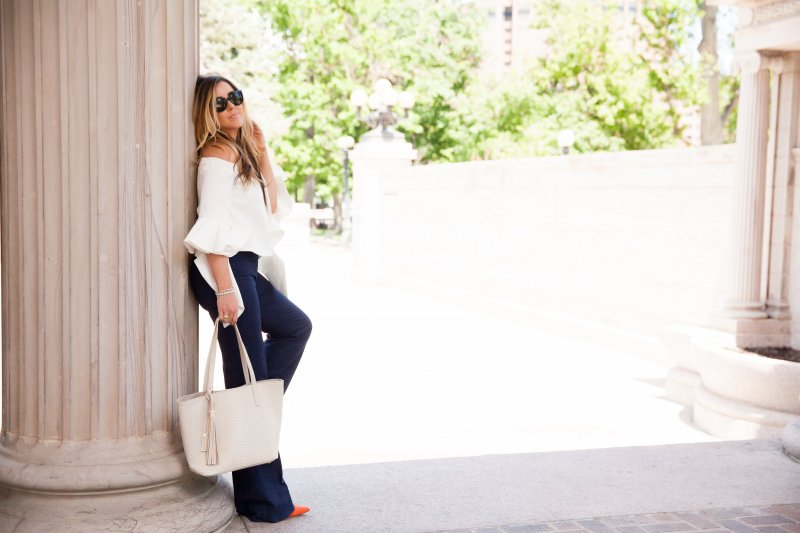
I would probably live in dreamy sundresses and feminine skirts if I could. But sometimes it’s good to switch it up. When I saw this top, I just loved the interesting frill detail on the sleeves and I knew it would make a statement. If you’re ordering, go one size up as it’s a bit short in the length… I’m 5’7″ for reference.
I paired this top with my favorite navy pants (still available in crop version) for a meeting downtown. Now I know you ladies in conservative offices will say you can’t wear this top to work, but hear me out… How easy it would be to switch into this top after work with happy hour or date night?! So cute. I can’t be the only one who used to pack an evening top and heels in my work bag?
Lastly, I just featured this beige tote on my Instagram. It’s the perfect size to use as your handbag but still fits a laptop or file folder. I love the color and the cute little bag tassel you can add onto it.
If you want the back story on this incredible jewelry line, read this blog post. And if you want to know the back story on my orange pumps, read this blog post.
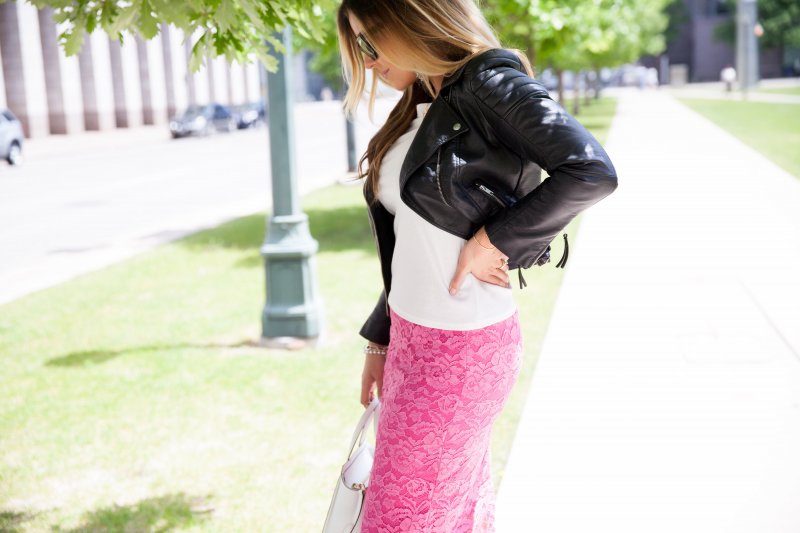
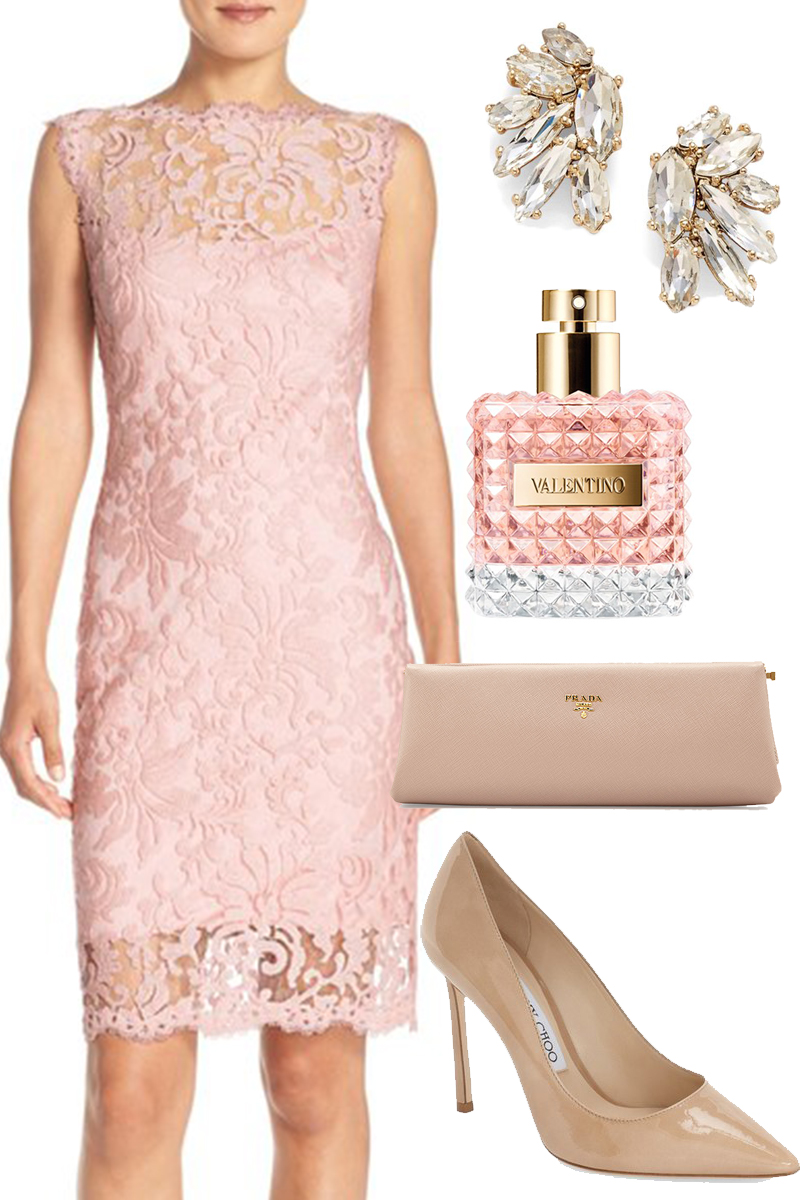
It’s no secret I adore feminine fashion. Soft colors, silky fabrics, ruffles, and floral prints all make up a significant portion of my wardrobe. So when I saw this beautiful lace pencil skirt in such a bright peony-pink color, I had to have it. I think pencil skirts are flattering on nearly every body type, and I love the texture lace can add to an outfit.
My Tips for Styling:
Take a look at my post with tips on How to Wear Brights. In the post, I share my tips on how to wear bright colored pieces like this skirt anywhere by pairing them with the right accessories.
For work, I would add a neutral blazer, tote bag, and pumps to keep this look business casual… If your office is too conservative for pink during the daytime, it could really add some oomph to a work event or cocktail party at night instead.
A moto jacket like this one toughens up this lace skirt and gives it the perfect amount of edge for date night or girls’ night out.
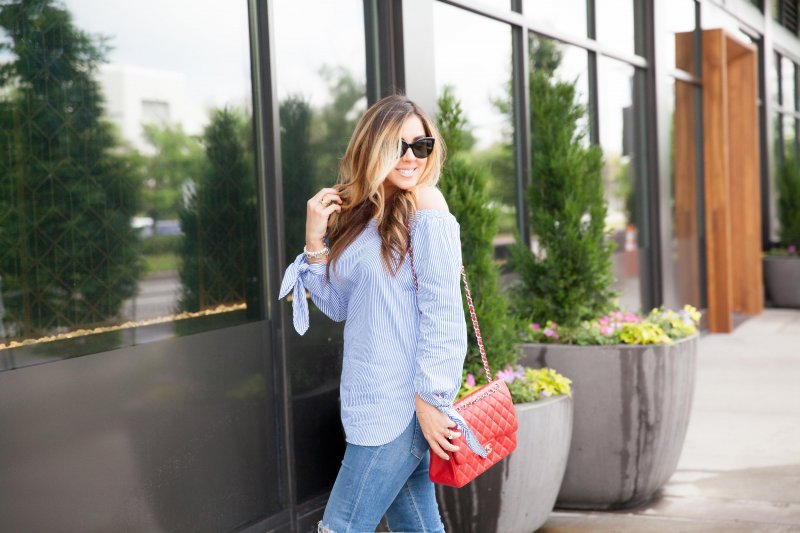
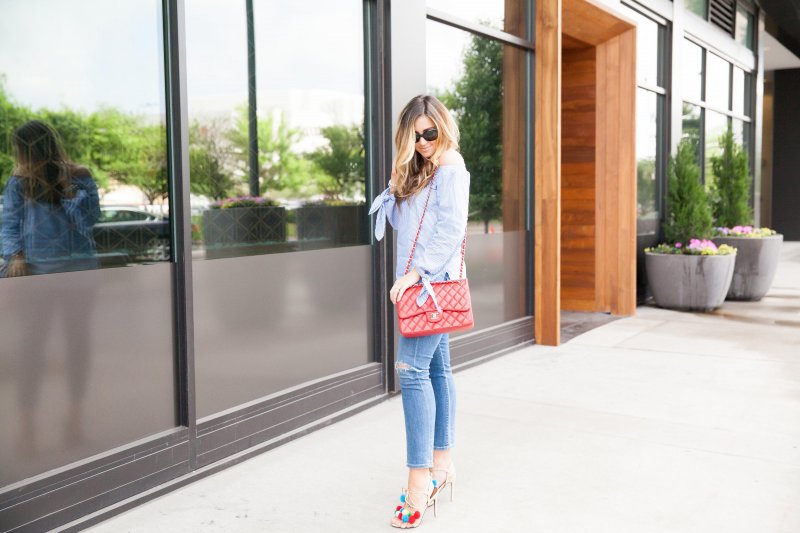
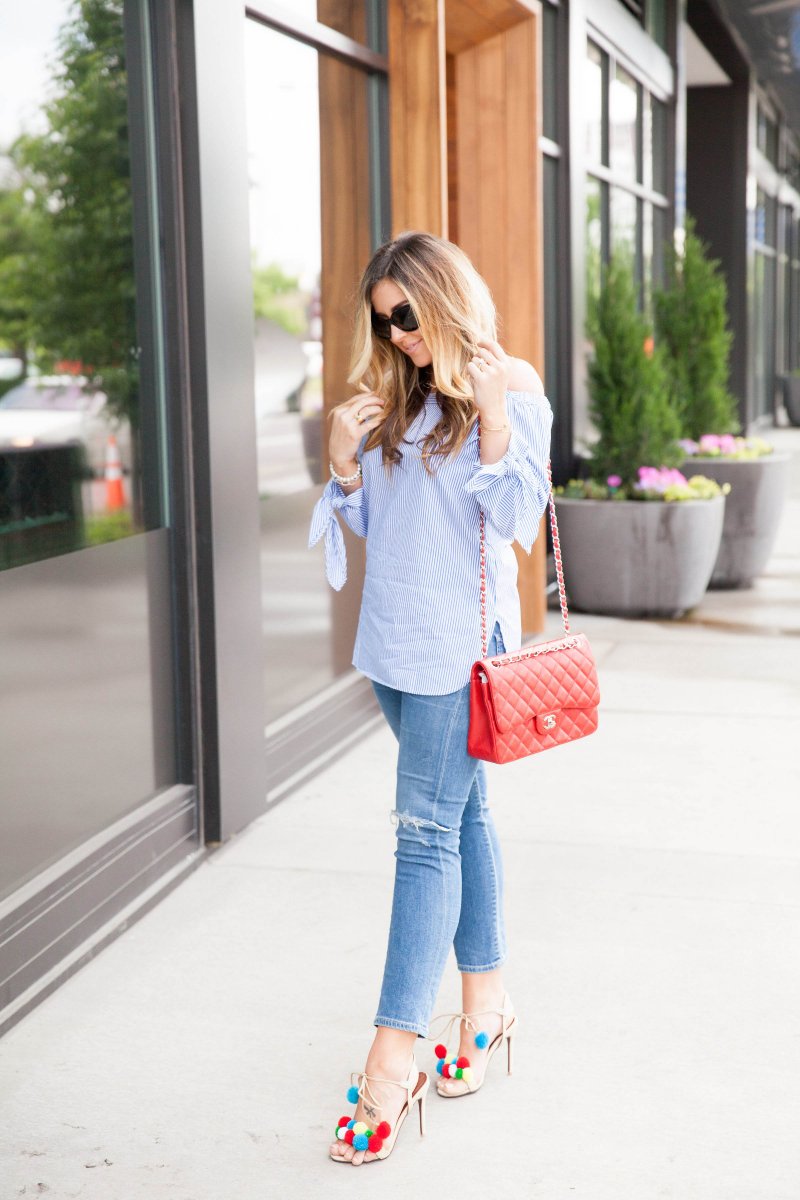
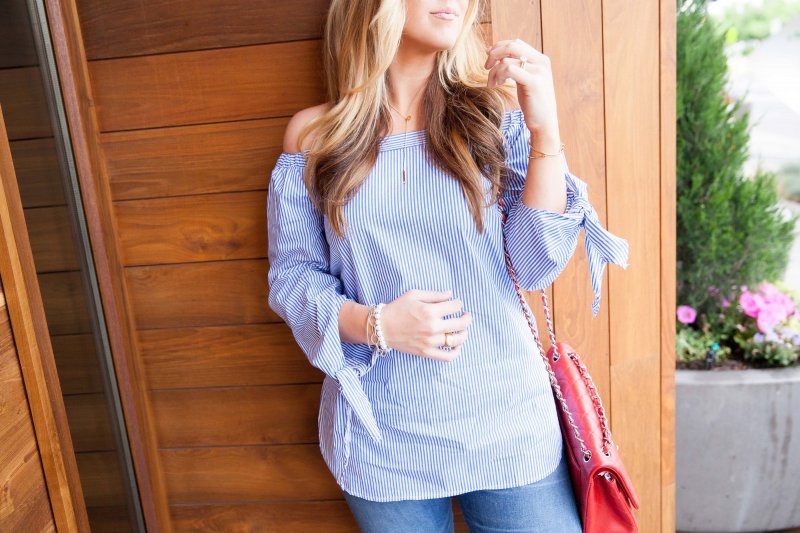
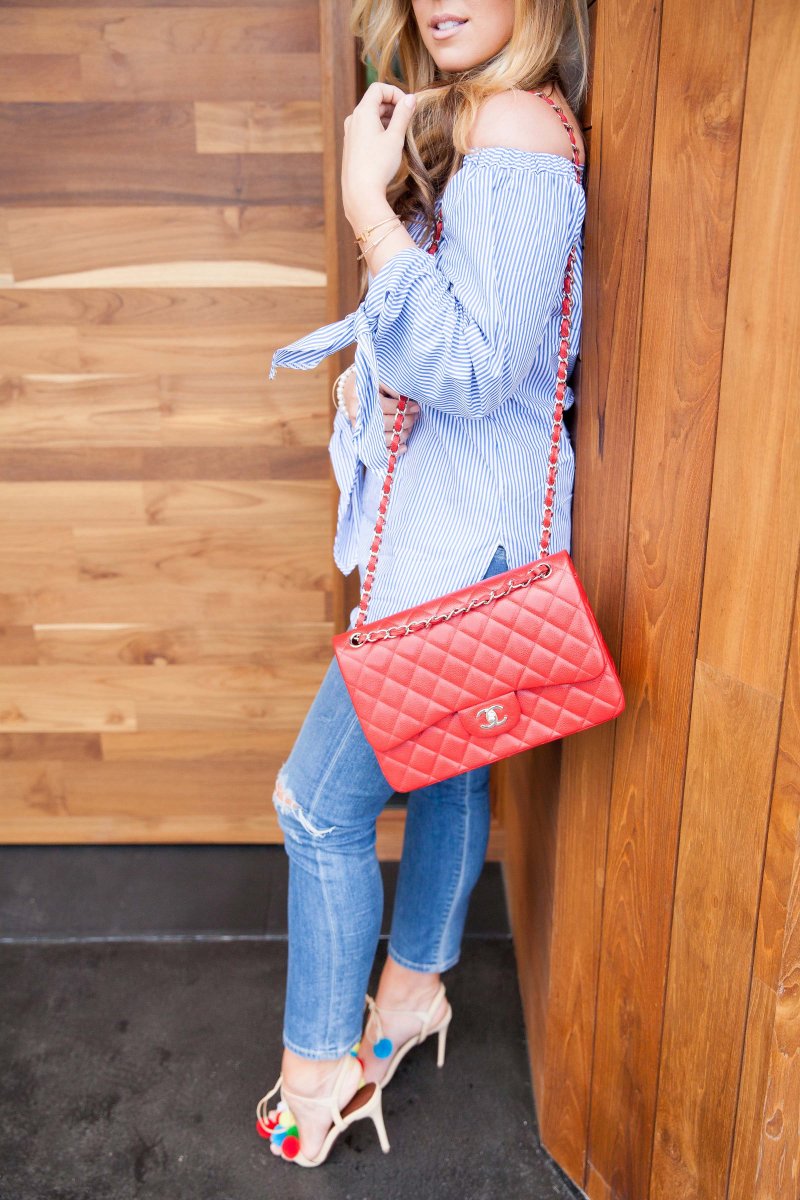
I wanted to style an outfit for Fourth of July events that was patriotic, but still wearable throughout the summer. If you follow me on Instagram, you know I’m totally addicted to the off-the-shoulder trend… I think these tops are so flattering and easy to dress up or dress down with accessories. This top is breezy, cool, and a steal at under $20. It runs just slightly small and since I think these tops look best more loose and airy, I would recommend ordering a size up from your usual.
Of course, I’ve paired this striped top with my favoriteripped ankle denim (I love the fit and look of these jeans so much I’m considering ordering a second pair) but I think it would look incredible with denim cut-offs. I’ve linked a similar off-the-shoulder top in chambray down below that would look perfect with white denim.
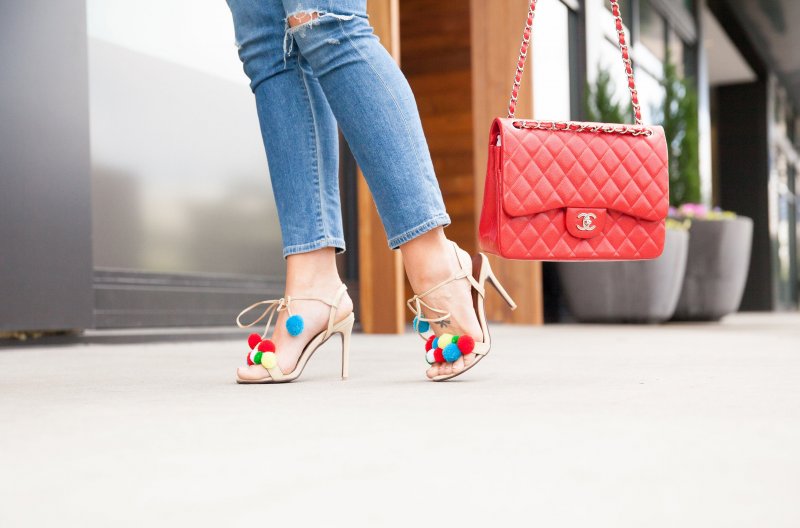
I’ve had my eye on a pair of pom-pom shoes for weeks now and couldn’t wrap my head around these pom-pom flats (even though they’re at least 40% off now) because they’re definitely a trendy item and not a classic investment piece. Then I found my pom-pom heels I’m wearing for under $70 and am thrilled to pair them with my summer looks. Order one size up from your usual size… They run small; I ordered a half size up and needed a full size bigger. They also come in a white heel version, a nude block heel version, and a nude sandal version so no matter what your heel preference, you can rock this look.
This is one of my absolute favorite handbags in my closet. If you’ve been saving or are looking for a Chanel investment bag, I would highly recommend the Classic Flap Bag in red because it will never go out of style (this style came out in 1955) and the bright red color works as a pop of color all year round. It looks great with crisp white and blue in the summer and chic with jet black in the winter. I was able to find this pre-owned Chanel Classic Double Flap Bag in a gorgeous bright red online… It’s the same size as mine (11-inch Jumbo) but in smooth lambskin, whereas mine is the textured “caviar leather”. You can take an extra 25% off with code TAKE25OFF for a limited time. I also found this pre-owned Chanel Classic Double Flap Bag in a similar red color but a size larger (13-inch Maxi) and in patent leather.
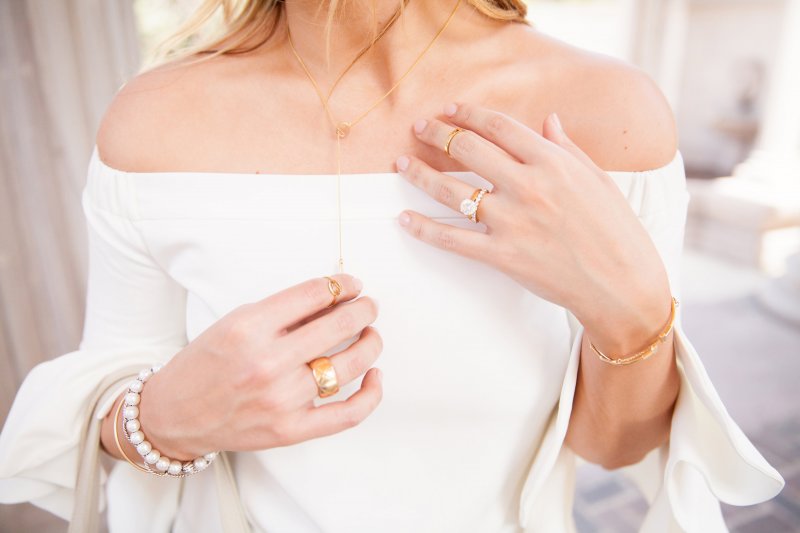
Lastly, I wanted to tell you about the necklace I’m wearing by a new Denver jewelry brand called Liberti. The necklace I’m wearing from Liberti’s <1% collection is for a great cause. According to the United Nations Refugee Agency, there are about 14.4 million refugees worldwide. Of this huge number, just less than one percent are processed and submitted for resettlement. Through its beautiful and dainty jewelry, Liberti is raising awareness for refugees and gives those in the United States jobs in hopes that they can be free to live the American Dream.
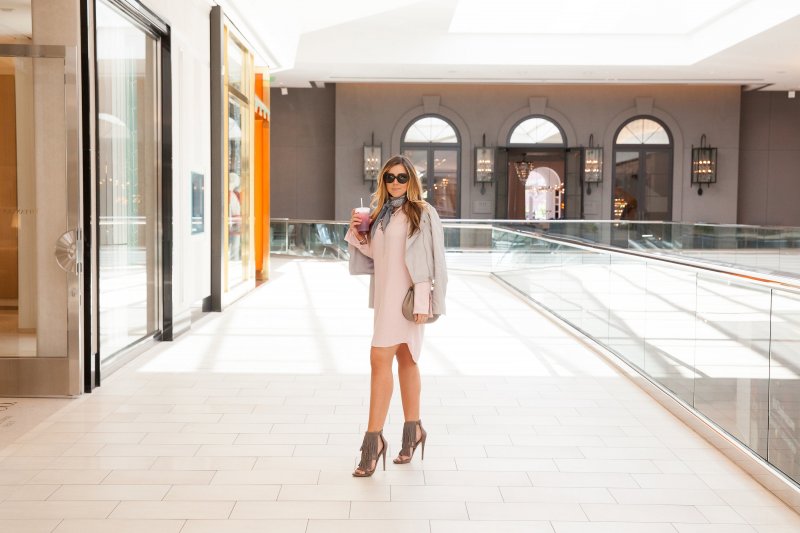
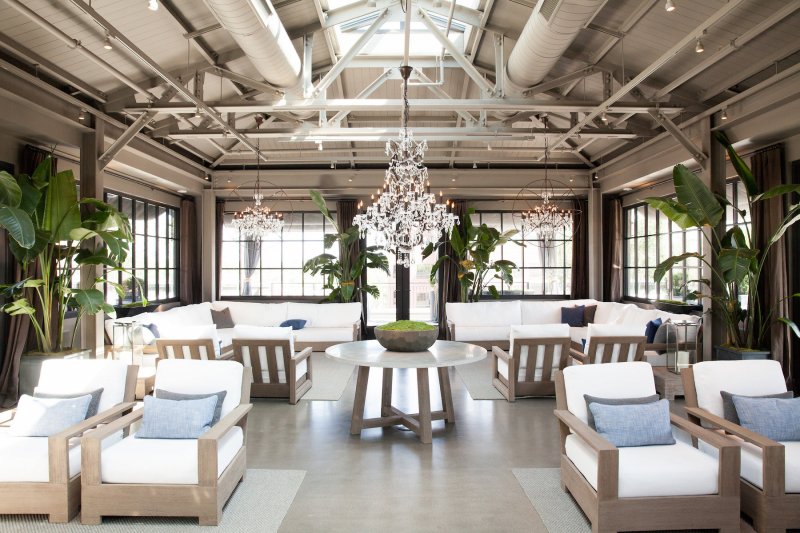
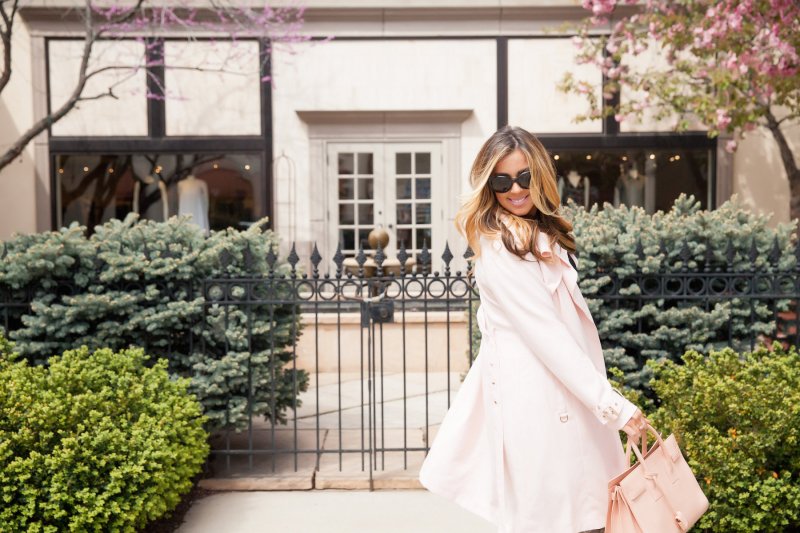
The beautiful Restoration Hardware store in the Cherry Creek Shopping Center is a place I go often for decor inspiration. (I previously did a blog post with its exterior as my backdrop.) My recent trip to RH was to scope out some new curtain rods and hardware, as I wasn’t thrilled with the ones I originally ordered for my closet re-do and ended up returning them. I can’t wait to show you the new closet when I’ve added all the finishing touches. The color scheme will contain my favorite colors at the moment… Blush pink and soft dove grey.
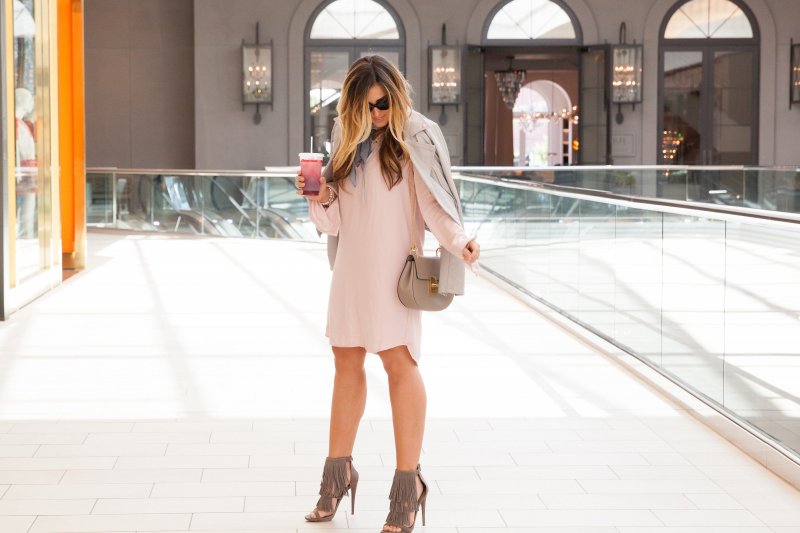
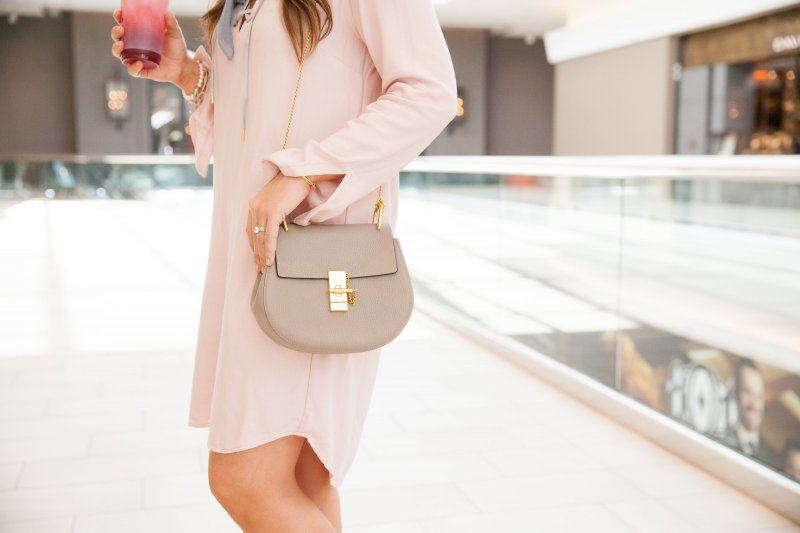
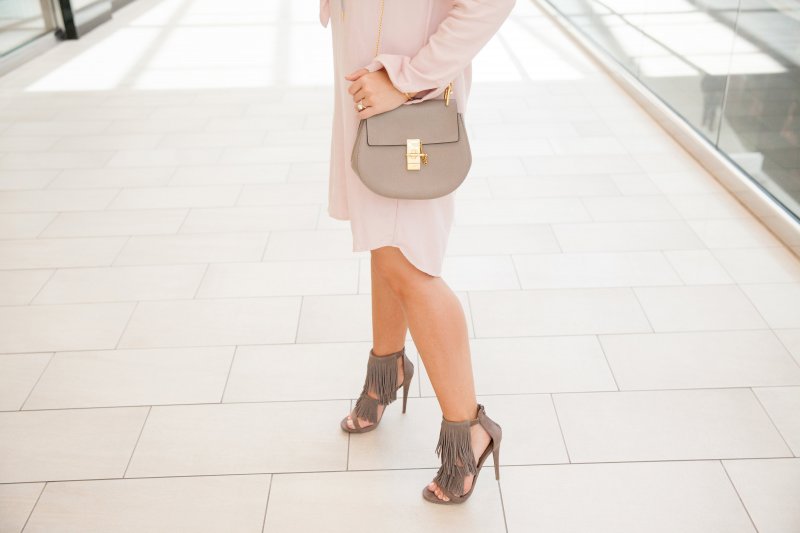
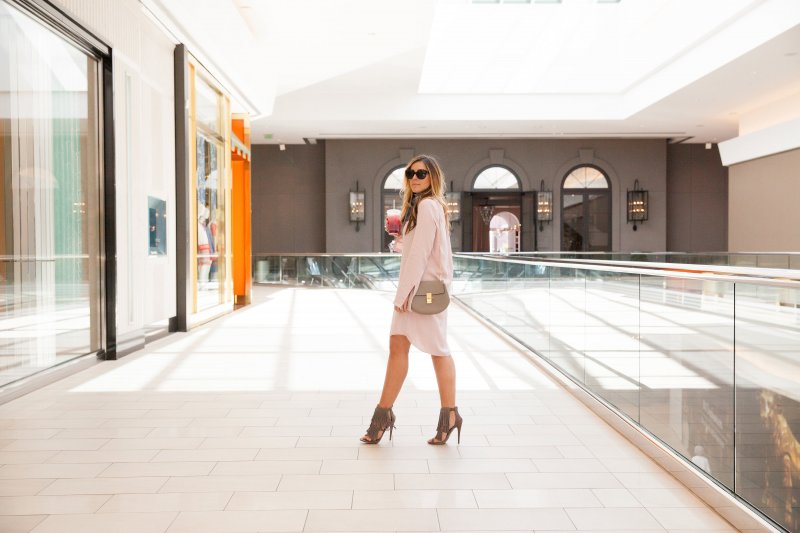
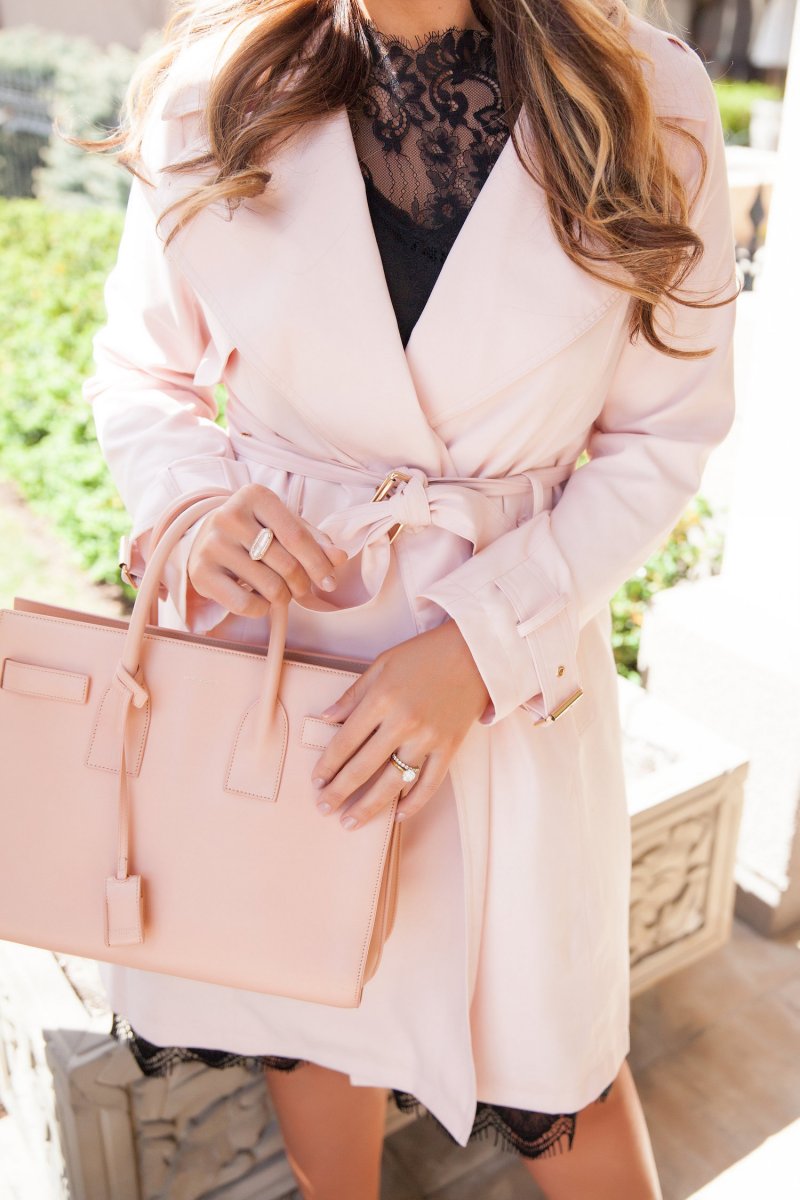
And speaking of blush pink and soft dove grey, the one I’m wearing above is one of my most versatile and comfortable outfits for spring/summer. The dress is by local Denver designer Never A Wallflower, and I love the lace-up detail that can be dressed up or dressed down. My favorite feature of this dress is the way the soft fabric gently hints at the body’s curves so it avoids being potato sack straight as many shirt dresses do. Instead, this dress remains feminine while moving with your body and is lightweight enough to be worn in high temps.
I accessorized the pink dress with soft grey accessories like my favorite faux leather moto jacket. I added my Chloé Drew Bag and these great heels I was thrilled to discover for under $35. I can’t sort out why the online version shows metal fringe detail as my pair of heels doesn’t have that. I’m not sure if it’s something you could easily pull off if you didn’t want it on? But I love the suede fringe either way.
The last accessory I wanted to mention is my gray bandana I’m wearing as a neck scarf. Ever since I went to Paris for the first time as a little girl, I admired the way French women wore the most beautiful scarves around their neck with anything from simple tees to dresses. Neck scarves are proof that the simplest touch can add so much to an outfit! I’ve linked a similar scarf, but really all you need is a small-ish square scarf to get the same look. If you’d like, I could do a little blog post or video on my favorite way to wear neck scarves and how to fold them.
Last but not least, I wanted to share my favorite summer drinks to grab on the go. The first is this Teavana drink I’m sipping in the photos. I order an iced Winterberry Tea (Strawberry Lemonade Herbal Tea and Strawberry Grapefruit Xue Long Green Tea combo) then I ask them to add Silver Yin Zhen White Tea Pearls… It’s fruity, tangy, and light. The second drink I love is one I recently Instagrammed from Starbucks… Their much talked-about “Pink Drink”!! It’s a Strawberry Acai Refresher with coconut milk instead of water. It is sweet and delicious! Let me know if you’ve tried either of these.
During the month of June, I’m going to be featuring some wedding-inspired posts. This is a wedding guest look, perfect for any wedding with a semi-formal dress code or a daytime ceremony before changing for a black-tie reception.
Also this month I’m hoping to catch up on my own wedding posts so I can share our ceremony and reception photos with you. Please let me know if you have any questions about wedding planning, our wedding, or wedding attire/makeup and I will try to answer those for you in upcoming posts!!
I just got back from a little over 24 hours in Nashville, Tennessee. I haven’t been there in ages, and while there I realized what a fun place it is. One of my best friends drove up to meet me since it was her birthday week and we indulged in Southern comfort food, a little shopping, and exploring the vibrant downtown area. We walked through the streets and listened to the live music pouring out of nearly every venue.
The next day, I attended a friend’s sweet Southern bridal shower tea with a “big hats and pearls” theme. It was so much fun and I left for the airport that night on a sugar high from so many sweet treats.
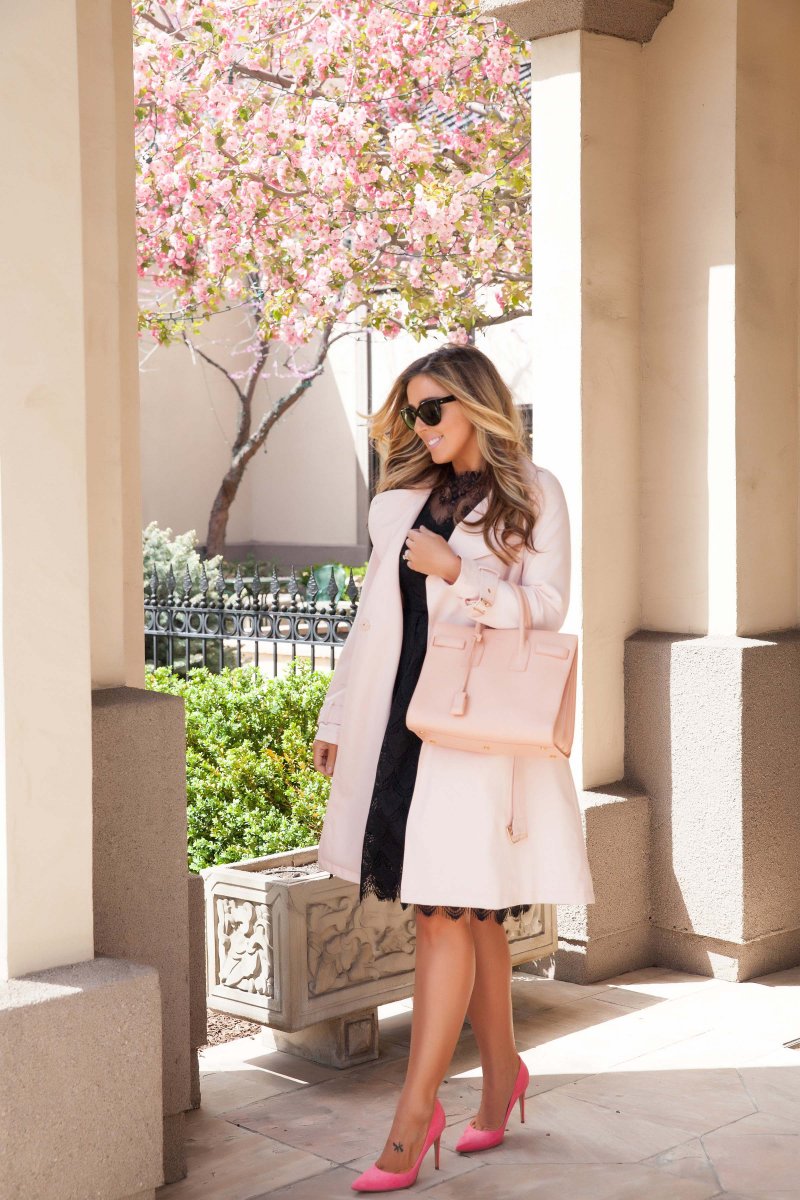
This pretty black lace dress would be perfect for any showers, graduations, or weddings you have this summer. We are always so busy in the summer and I understand how difficult it can be to find outfit options for every event… And none of us want to wear the same thing each time.
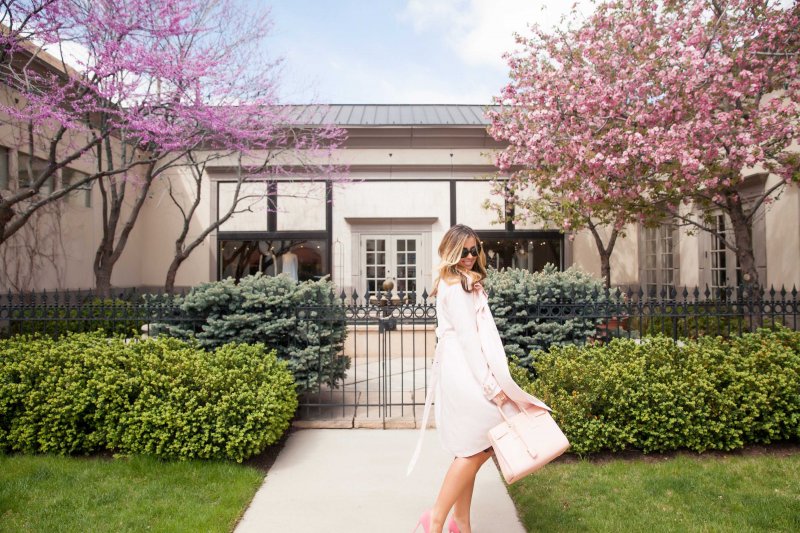
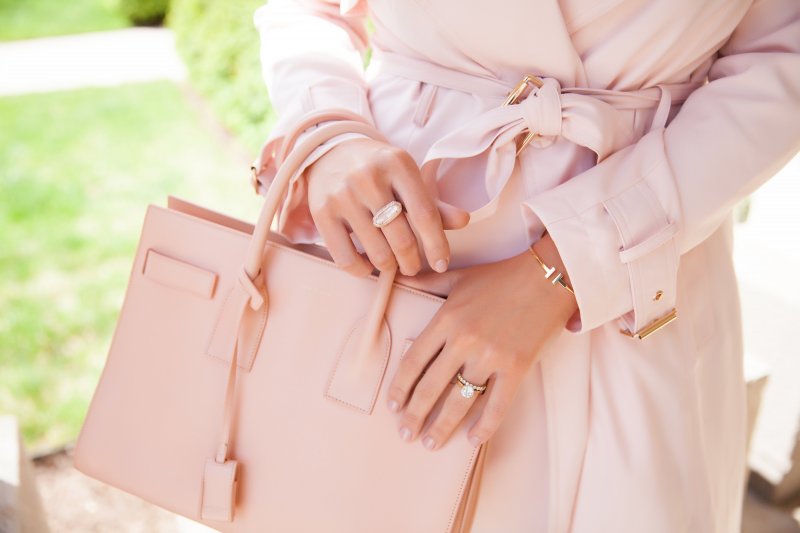
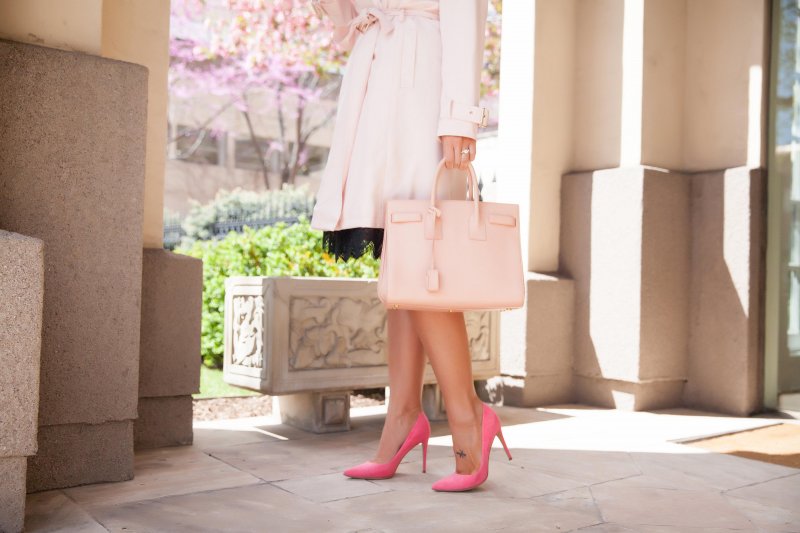
We know that LBD’s are an essential part of any wardrobe. And at under $20, this one is easy to add to your special occasion outfits this summer. I added a blush pink trench coat (now on sale) and blush pink handbag with suede heels in the same but slightly brighter tone.
LBD Tips:
Choose a classic style so you can wear your LBD as long as possible. Shift, pencil, and a-line are all great options that will last you years and years.
Accessorize your LBD with a pop of color to keep it from looking a little dull at happy occasions like showers and weddings or in “brighter” months like summer.
If you’d like to add more than one colorful piece like I did for this look, keep the colors in the same color family for a uniform, chic look.
I’ve been self-tanning since I was twelve and had several horrible self-tan mishaps at the beginning. My first experience involved being a pale sixth grader, using the darkest Neutrogena spray, and leaving my socks on to spray tan. So embarrassing, especially in middle school! At least I was adventurous, right?!
Since then, I have learned so many tips and tricks for achieving a flawless, natural-looking self tan. When people learn that I tan myself and have not tanned in a bed for years, they ask me so many questions and request how-to videos and blog posts on the subject. I made a video years ago – it was one of my first YouTube videos and the quality is terrible – but I liked the idea of typing everything out and explaining it here in a blog post for you.
I used to tan in a tanning bed in high school and college and didn’t listen to my parents’ warnings. After going to the dermatologist regularly and working for a skincare company, I learned more about skin cancer and was horrified to realize how much I was harming my skin all those years. A close relative being diagnosed with melanoma made me even more vigilant and cautious. I know you’ve heard it over and over, but sun protection should be a vital step in your skincare routine… Freckles are not cute little spots but are actually permanent skin damage. If you’re not doing it already, be sure to visit a dermatologist for yearly head-to-toe skin checks as early detection is key to preventing skin cancer.
I can get very pale in winter, but tan easily and never burn. I love being tan and have always assumed my skin type would protect me from skin cancer. However, my relative who was diagnosed with melanoma has the exact same skin as I do. We have Mediterranean and Native American genetics… It’s important to know that anyone can get skin cancer.
I am currently working on a post and video of my favorite sun protection products for you. It’s not to say that I won’t indulge and be in the sun while on a fun vacation, but other than that you will find me layered in SPF and under an umbrella or sun hat. Self-tanning is my way to look good and feel confident while knowing that my skin is protected and safe. And being able to self-tan at home saves me a lot of time and expense.
I hope you enjoy my tips, and please let me know if you try them!!
Step 1: Preparation
Be sure to get any intense exercise prior to self tanning because heavy sweating can ruin a spray tan. I also suggest doing any type of hair removal – waxing, shaving, tweezing – ahead of time. Most hair removal methods are a type of exfoliation and will remove your spray tan if you do them after you tan. I always like to get my manicure and pedicure prior to spray tanning as well since polish remover, nail tools, and exfoliation will remove your spray tan.
Step 2: Exfoliation
I like to shower right before I spray tan as it ensures my skin retains just a little moisture to prevent it from being too dry and absorbing too much color. A key step in my spray tan routine is exfoliating in the shower. I use an exfoliating scrub on my face, exfoliating polish on my lips, then cleanse with a facial brush.
If you are someone who does facials or professional skincare treatments, I highly recommend doing a dermal planing treatment prior to self-tanning. A less expensive option is to use a mini razor on your face to get the same effect and remove dead skin and fine hair.
After exfoliating my face and neck, I use a gritty scrub all over my body then use a loofah to really buff my skin smooth. If you don’t have a body scrub you can always use organic coffee grounds. As a finishing touch, I use a foot file on my feet to remove any dry skin.
Step 3: Moisturize
After I get out of the shower and dry off I apply toner, eye cream, lip balm, and a gradual tanning moisturizer to my face and neck. Then I use a generous amount of heavy moisturizing body cream on hands, elbows, knees, ankles, and feet. This ensures that the more dry areas of the body don’t absorb too much color. Once your hands are dry enough, put on vinyl gloves.
Step 3: Self Tan
Fold a towel in half or thirds and lay it on the bottom of your shower. Then lay a clean towel where you will sleep on your sheets and a clean hand towel over your pillow. I’ve never had spray tan stain my towels or sheets, but it’s always a possibility and you want to protect them as much as possible.
Step onto the folded towel in the shower and stand with legs apart. Be sure not to move your feet from this position throughout your self-tanning as doing so will cause your feet to pick up any color that has fallen or dropped onto the towel.
LOTION: I layer two coats of different self tanner formulas to get a more natural effect. Starting at the calves and working upward, begin applying self-tanning lotion to the legs. After applying to calves, use the remainder of the product left on gloves to lightly rub some in to the tops of feet and ankles. After applying to thighs, use the remainder of the product left on gloves to lightly rub some in to the knees and backs of knees. Making sure to rub self tanner in thoroughly, apply lotion to the booty, stomach, rib cage, chest, neck, face, and arms. I cover my entire body in product, staying away from the armpit area.
BACK: If you’d like to tan your back simply apply a bit of product to your gloved right hand and reach over your right shoulder and behind your back to rub in to the top of your back, then switch arms to reach the left side. You can even apply product to the front of your gloved hand and reach up toward your middle/lower back to apply, then switch and apply using the other arm/hand. I find that I’m able to reach all of my back area myself because wearing gloves allows me to use the front of my hand for application as well. You’ll look like a contortionist, but it works!
SPRAY: Then repeat the whole process using a self-tanning spray. As I mentioned above, be sure to only use excess from calf and thigh application to lightly apply color to tops of feet and knee areas. Working your way up, spray and thoroughly rub in self tanner all over body, face, and neck. Use the same method to reach all your back areas. If you’re still having difficulty reaching your back area, try using an airbrush-style self-tanning spray like this one.
HANDS: Carefully step out of the shower making sure not to step on the towel with self tanner. Squeeze dime sized amounts of self tanning lotion onto two cotton pads. Then spray two more cotton pads with 2-4 spritzes of self tanning spray. Remove one glove and with the gloved hand, gently wipe the cotton pad with lotion over the top of the ungloved hand, fingers, and blending down into the wrist area. Repeat with the other hand and be careful since you’ll now be applying with ungloved hands. Lastly, repeat on each hand with the sprayed cotton pads.
Stand in front of a fan or let your body dry for several minutes before getting into bed.
Step 4: Preserve
When you wake up the next day rinse off in the shower with lukewarm water, don’t use a loofah or body scrub, and lightly pat yourself dry. For the next 2-3 days don’t shower with hot water, scrub your body, get in chlorinated water, or sweat excessively.
If you have any streaking or spotting, you can use a scrub or loofah on those areas. Another method I’ve tried that works wonders on spots and streaks is applying cream Nair to the spotted area, letting it sit for 10 minutes or so, and harshly rubbing off with a dry towel.
Be sure to use your moisturizing body cream to moisturize your body each day to keep your skin soft and your tan looking smooth and even. About 2 days after I self tan, I like to start using a gradual tanner for face and body daily to help preserve my tan.
Step 5: Enhance
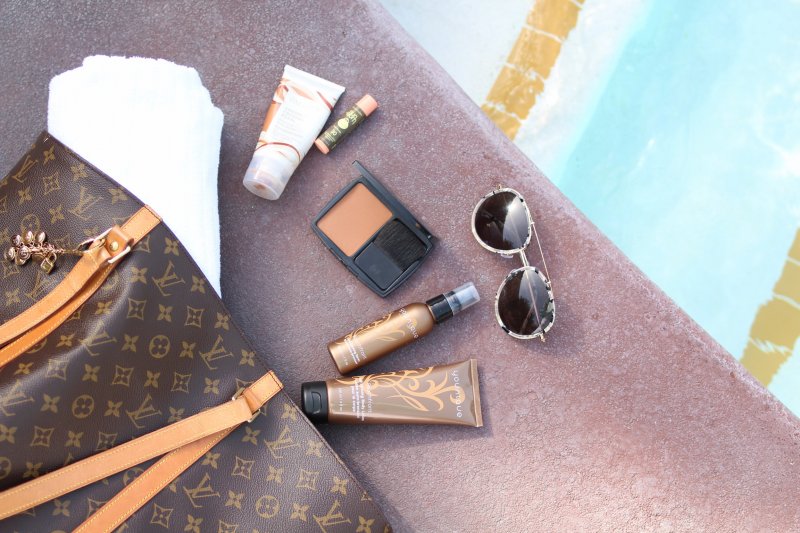
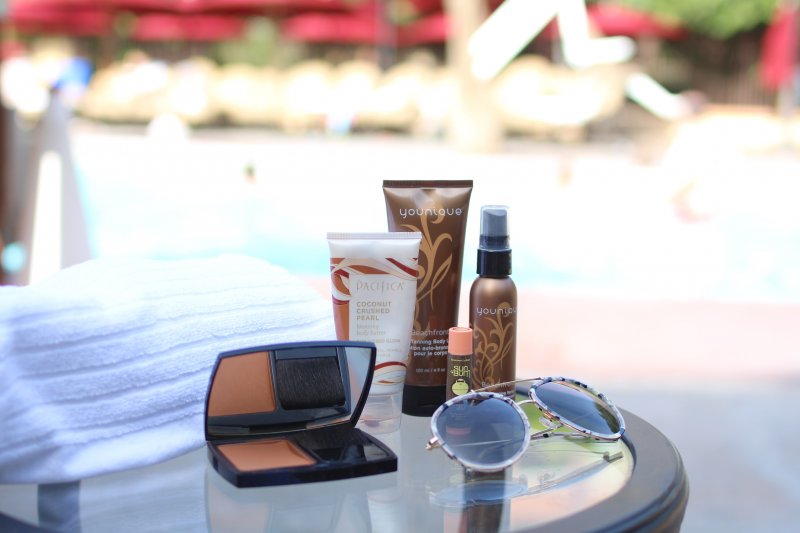
BRONZER: I also love using bronzing products after a self tan to bring out my glow even more… The trouble is each time I find one I adore it is discontinued within a couple years, so if you have favorite bronzing products I suggest stocking up! My favorite bronzer to use on my face and neck was Chanel’s Moisturizing Bronzing Powder in “Terre Ambre” but a similar version is Benefit’s Hoola Bronzer. These bronzers are the perfect color, aren’t too shimmery, and can be used for contour as well.
SHIMMER: I also highly recommend finding a shimmery bronze lotion or oil to apply on your arms and legs to beautifully highlight your new tan like the one shown from Pacifica. I’m currently browsing these glowy body products for my next purchase when my Pacifica shimmer runs out: shimmering dry oil and bronzing luminizer.